|
There are many reasons to rewig a
doll. Has your doll had too much loving and now her hair is a frizzy
mess? Are there budding beauticians in residence at your house? Maybe you
have a doll that just doesn't seem right to you as a
blonde/brunette/redhead. Some people love a particular doll so much they
change the wig on her so that they can have more than one without having
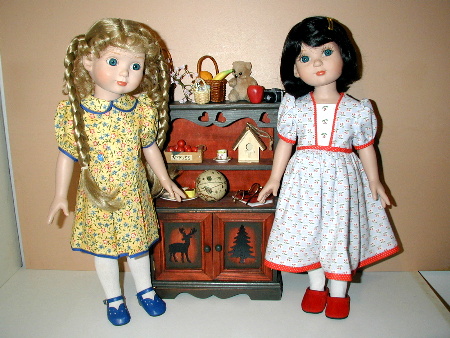
identical twins. For example, here are two of Cathryn's 18" Ann Estelles
with new wigs, then the original Ann on the right:
|
 |
 |
Whatever your reason for rewigging, it's
really not very difficult. There are, however, tips and hints that make
the process easier. This article describes the process using step-by-step
instructions and lots of pictures. Most of the pictures were taken during
a "rewigging party" with my sister, Susan, who wanted to learn the process
so that she could fix the hair on one of her daughter's dolls. (That is
Susan in the pictures.) Like all
these dolly projects, rewigging is most fun when done with another doll
lover or at least with a digital camera so you can share the experience
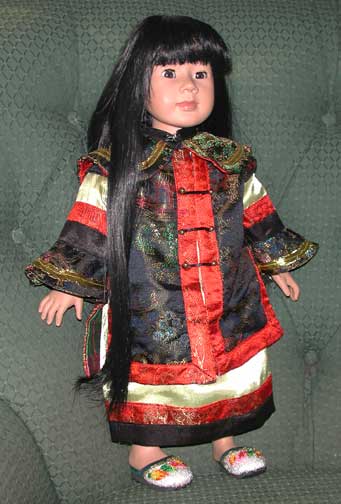
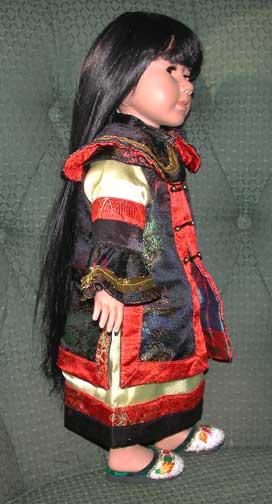
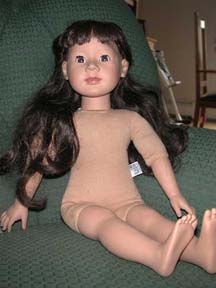
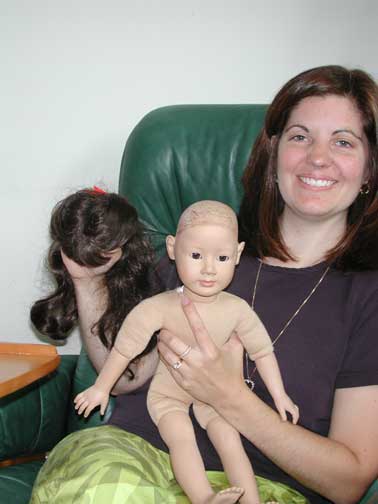
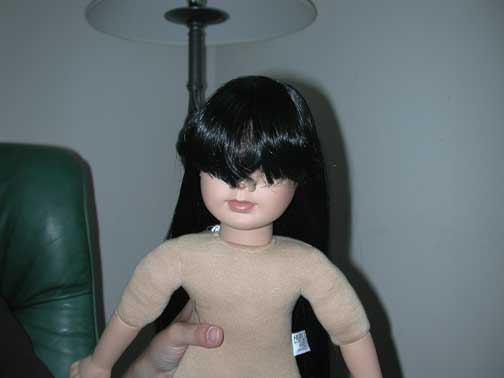
with your friends on-line! Here is our subject, Anna, a Heidi Ott Faithful Friends doll,
whose wavy, dark brown hair just didn't seem appropriate for an
Asian doll:
|
 |
So, here are the steps for rewigging a doll:
Step 1: Remove the old hair
This step should be done first if you have any doubt about the size of the
new wig you'll need. It's easier to measure when the doll is bald.
Usually, you can just place the old wig back on the doll (without gluing
it on) if you have to wait a while to get the new wig.
There are two ways a doll's hair can be attached: rooted or wigged. It's
easier to remove a wig than to cut rooted hair, but neither is
particularly difficult.
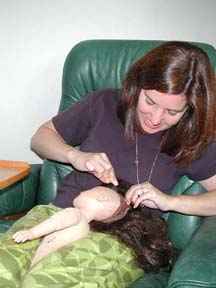
1A: Removing a wig
Depending on the glue that was used, an old wig may just pop right off or
you may need to use a fair amount of elbow grease and maybe a tool. Start
on the back or lower side of the head so that, in case you need to use a
tool to help pry, you're less likely to scratch face paint or damage eye
lashes if your tool slips. Start by grabbing the edge of the old wig and
pulling it up toward the crown of the doll's head. If you wish to salvage
the old wig, don't pull by the hair because some will most likely come
out.
If you're lucky, the old glue will not be too strong and you can pull up
enough to get a good hold on the cap, then continue around the edges
pulling up more.
If you're not lucky it will be hard to pull away much of the old cap and
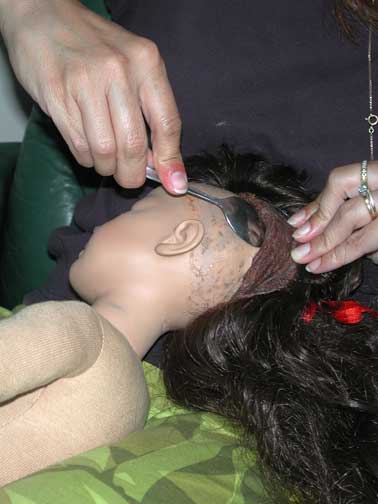
it's time to go rummaging for a tool. I've tried a butter knife, flathead
screwdriver and a little frosting spatula, but the best tool for the job
turned out to be a metal baby spoon: the bowl conformed nicely to the
shape of the doll's head, it was thin enough to slip nicely under the cap
and it wasn't sharp so there was no danger to vinyl or fingers. Use what
you can find in your drawers but beware of sharp tools (don't ask why I'm
emphasizing this.)
|
 |
 |
Some people recommend using warm or hot water or a hair dryer set on low to warm
the glue and soften it but my experience has been that this doesn't help
very much. Without a second set of hands these methods can be awkward,
there's a slight chance of damaging the doll or the wig and I've never
encountered a wig that didn't succumb to brute force (with maybe a mild
cuss or two thrown in). If you aren't having any luck getting the wig up
by prying with a tool, try the heat. Or, if you know that the wig was applied with a
glue gun, very hot water may be the best way to get it off. You might try
adding some Forumla 9-1-1 (from
Twin
Pines) to the water since it softens glue.
Once you get some of the wig off it'll be
easier to pull off the rest because you'll have enough to get a good
handful for leverage. Be careful not to pull too hard and injure
your hands, though! The motions used to pry off a wig
with your hands (as in the next picture) are unusual and one on-line doll
friend strained her hands at this.
|
 |
OK, you've tried all this and the wig still won't come off? Alas, it may
have been applied with superglue. In this case you may want to try
non-acetone nail polish remover. Apply it along the edge with a cotton
swab. (This time it's really important to start in the back, just in
case.) As you peel away the wig, keep applying the remover along the edge.
You can also do this to remove any wig cap that may have remained stuck to
the doll's head if you can't scrape it off.
With any luck this is your result:
|
 |
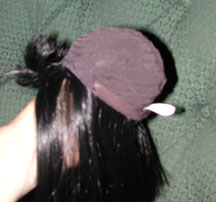
1B: Removing rooted hair
If your doll's hair is rooted there are thousands of hair plugs that have
been inserted into little holes in the scalp and then tied off inside. To
remove it, chop it off close to the scalp with scissors. If you want you
can try shaving the head with a razor (throw away the blade when you're
done). If you've got clippers like the Wahl hair clippers or even clippers
designed for pet grooming, they may work well but be aware that synthetic
hair can dull them quite a bit. I just use the inexpensive Goody brand
hair cutting scissors you can get at almost any drugstore and I keep them
in my project box so they don't get used for real haircuts.
Purists will clip the hair to the scalp then
remove the head and use a crochet hook or other small tool to pull out the
hair from the inside, removing all stubble.
But you don't have to get the old hair shaved to the scalp - a little extra
glue should help the new wig adhere just fine.
Step 2: Find a new wig
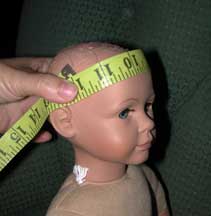
The first thing you need to do before you go look for a new wig is
determine the size you will
need. Most 18" dolls take a 10" - 12" wig. If you
have any doubt about the size, it's easy to measure
using a cloth tape measure. Place the tape measure behind the ears and
across the forehead, approximately where the hairline will be. You can
do this with the old wig still in place, but you will need to adjust down
slightly in the measurement. Wigs come sewn onto stretchy caps, so you
don't need to be precise. If the measurement is close to the upper end of
a range or very close to the lower, say 10 5/8" or 11 1/4", always choose
the slightly smaller size since the cap will stretch.
If you have a wig that's too big, you can
adjust it by sewing one or more tucks around the edge of the wig cap. If it's a minor adjustment, some
wigs have a Velcro band inside that you can use to tighten the wig. You can also snip the edge of the
cap to allow it to stretch wider if the wig is slightly too small.
There are many sources for wigs:
Bricks and mortar stores. Look in your yellow pages for pottery
studios or craft stores and ask if they have classes in porcelain doll
making. If so, they may carry wigs that you can go look at in real life to
get a good feel for style and quality, or they may be able to point you to
local sources.
Doll shows. This is a great source because you can see and compare
but the wigs but they may not be in as good condition since they may
have been handled, packed and unpacked a lot.
On-line stores. There are many web sites that carry doll wigs. Here
are a few notable ones:
Web sites come and go daily it seems, so one of the best ways to find what
you're looking for is a web search (www.google.com is my favorite) for
"doll wigs" and optionally a brand name. Good brand names are:
 |
Bell Ceramics |
|
Global |
|
Kemper Collection |
|
LaSioux |
|
Monique |
|
Playhouse Import/Export (out of business
but still available) |
Doll supply catalogs. Antina's, Global Dolls and most others have
a printed catalog you can order. It may be easier to see colors from
photographs rather than your computer monitor.
As you will notice while browsing these sources, wigs come in a several
materials and a broad range of styles and prices. Here are a few things to
keep in mind when choosing a new wig:
|
You can expect to pay between $10 - $25
for a good quality, synthetic wig for an 18" doll. Kanekalon is the
finest brand name synthetic material for doll wigs but it is expensive
and not always labeled as such. (As your supplier if their "synthetic"
or "Modacrylic" wigs are Kanekalon.) You can buy mohair and human hair wigs for
your dolls but neither are generally used for dolls meant for play
rather than just display. (The advantage of human hair is that it takes
heat better so you can curl it with a curling iron.) |
|
The style you see in a picture of a wig
is generally the style it comes with - complete with bows if they're
shown - and are meant to be kept in that style. Up-dos don't always come down. Wigs that are put up may be sewn
that way and may not work if you take them down. Braided hair is often
cut once braided, making the bottom uneven when you take the braids out
(e.g., Molly and Kirsten from American Girl). Sometimes hair is cut from
the back of braided wigs to make it look neater. |
|
If the doll is going to be played with,
straight hair is best. Ringlets and long curls are pretty at first but
are awful to keep looking nice. Of course, you can always rewig again. |
|
If you're trying to match the hair of a
particular doll, ask on the appropriate mailing list for advice on what
other people have used. For long, straight hair with bangs, similar to
the American Girl of Today, you can try the Denise wig from Monique. The
Carmen from Global is similar to Felicity's original. The
Doris wig, from Monique, is very similar to Ann Estelle's original
style. Engel-Puppen sells a braided wig with bangs that is
indistinguishable from Kirsten's (it is $18.50 + $20 postage from
Germany, though.) |
|
If you buy a lot of wigs, you can
purchase a color ring from
Monique Trading
with a little labeled sample of each of their wig colors.
 |
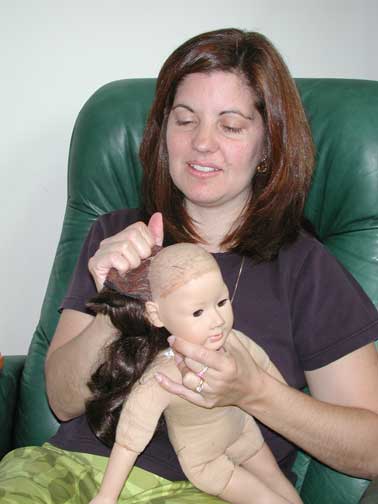
Step 3: Apply the new wig
To put the new wig on, first, place it on the doll and look at where it
falls above the eyes and over the back of the neck. Some people mark where
they want the wig to fall, but I don't find this necessary or useful. You
may want to put long hair in a ponytail and bangs up in clips in order to
keep the hair from getting glue on it.
 Now
it's time to flip your wig! Turn it over, inside-out, on your
hand. Apply a circle of glue to the inside
of the wig approximately in the center. Put a few more concentric circles
of glue around that. Make the last circle about a half of an inch from the
edge of the wig and then smear it close to the edge with your finger. Now
it's time to flip your wig! Turn it over, inside-out, on your
hand. Apply a circle of glue to the inside
of the wig approximately in the center. Put a few more concentric circles
of glue around that. Make the last circle about a half of an inch from the
edge of the wig and then smear it close to the edge with your finger.
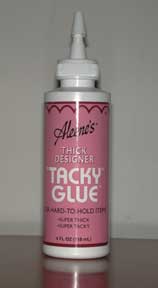
What glue should you use? Most people use Tacky Glue you get from the
craft store, as shown here. White school glue (like Elmer's) is fine, too, if the doll is
not going to be played with by children or if you want the wig to be secure but
easy to remove later. Rubber cement will also work. Finally, you can buy a
special "Dolly Hair Glue" from
A Dolly's World,
though I have not tried it and I do not know if it is any better than
basic craft glue.
Why use any glue at all? If the cap of your wig is stretchy enough it can
be nice to leave the wig just placed on the head. With a few spare wigs in
different styles, it is like having several different dolls. Also, if
you're a seamstress, being able to get the hair out of the way as you
dress the doll for photos can speed things up and protect the hair from
being snagged on fasteners.
But, assuming you do want the wig attached, apply the glue as described
above with more or less glue depending on how easily you want to be able
to remove it in the future. With the wig still inside-out on your hand,
place it on the back of the head approximately where you remember it being
from the test fit. Flip it right-side-out onto the head and position it
where you want it. Press very gently just to make sure the cap is against
the doll's scalp. If any glue is visible around the edge, wipe it off with
a cloth. If you accidentally get any glue on the hair, it may be easier to
remove if you let it dry first.
It's generally OK to brush the hair gently after the wig is on (especially
with Tacky Glue), but you should let it sit overnight before doing
anything more serious.
Step 4: Cut and style
|
 |
After your new wig is on and the glue is
dry, you may need to trim it so that the bangs are the right length or the
over-all length feels right to you. Don't be intimidated - just cut a
little at a time until you're happy with the look. Sharp, small scissors
work best, such as the haircutting scissors you can buy from the drug
store. Now you can curl or put up or braid to your heart's content. Stand
back and admire the new look!
If you got here from the Doll Restoration
Wizard, click the button below to go on to the next step.
 |