![]()
|
|
The Body Swap ~ An Illustrated Guide |
|
|
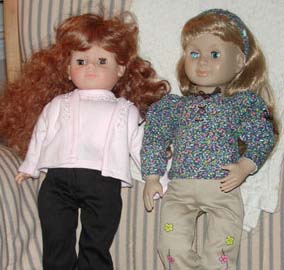
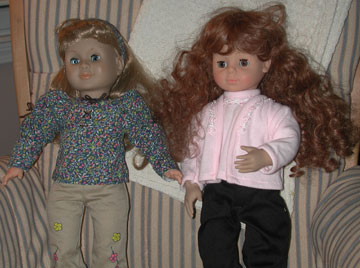
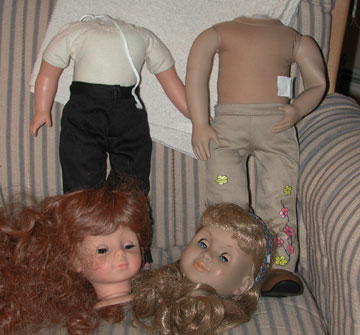
The thing that makes a doll call to me is her face. But what if she has a cute face but her body style is unappealing? Or what if her body is damaged beyond repair? If she's a soft-body doll, I will consider swapping her body with that of another doll. It may sound drastic, but it's actually one of the easiest customizations you can make. And if you don't like the results, it is easily reversible. I have a personal preference for the fully jointed doll body like that of the American Girl dolls. Dolls with cloth extending down their arms and legs can't hold a pose, won't stand unaided and often hold their arms in an unnatural manner. Some consider it a crime to change the body of a doll ("this is the way the artist meant the doll to be"). In that case adding an armature is another way to make the doll more poseable. If you'd rather pursue that option, see the Kit Dolls article for how to obtain and insert an armature. Since I also like dolls with extra joints, a friend pointed out the new Our Generation doll (from Target) who had both jointed elbows and knees. I was interested, but for me, the faces of these dolls fall in the "leave them on the shelf" category. I decided that I would buy the doll and swap her body with an older Götz doll I have who has soft shoulders and upper thighs but a lovely face. Below you can see before (left) and after (right) pictures of the dolls:
The process of doing a body swap is very simple: Step 1: Find an appropriate "body donor" A good choice for "body donors" are the Götz dolls that you can often find at close-out stores for under $20. TJ Maxx sold off the remaining Little Sisters dolls after iDolls.com went out of business and has recently been selling Precious Day dolls. Costco has been carrying Götz Stolle dolls. Götz made the original American Girl dolls, so all of these have bodies that are almost identical to American Girl since they are from the same molds. Another good source of donors are the "knock-off" dolls such as Girls On the Go and Laura Ashley, that are sold at Toys 'R Us and discount stores like Walmart and Kmart. These are generally under $20 and they usually have fairly nice, articulated bodies even though their hair, clothes and other details leave a lot to be desired. It is important to match the skin tones when you choose a donor. As you can see from the pictures, these dolls weren't the ideal pair to use in a swap because their skin tones are not compatible. I'm afraid the doll in the pink sweater will be stuck wearing mittens or I may need to reverse the operation. I have found that Apple Valley dolls are generally compatible with Girls on the Go bodies and Heidi Ott are generally compatible with Götz bodies, but each pair must be evaluated separately. Another consideration when choosing a pair to swap is size. These two dolls are both smaller than "standard" American Girl size so the choices for swap partners were limited. Generally, I pass along the "remnant doll" to a local homeless shelter. If you have done a body swap on a doll you plan to sell, make sure you mention it because a collector who is a "purist" will care. Even if you go articulated to articulated, there are slight variations even on some of the doll bodies; for example, the Little Sisters tend to be slightly "pigeon toed" and the new "made in China" dolls may not have as high quality vinyl as the American Girls.
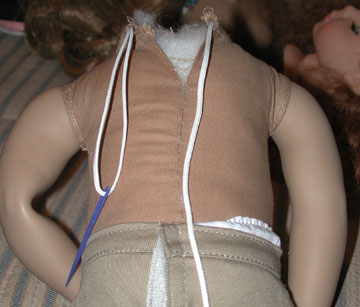
There are two ways the head can be attached to a cloth
body: with a tightly tied string or with a plastic
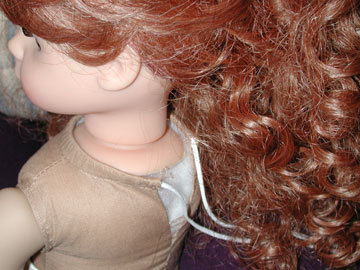
Some dolls, like Heidi Ott Faithful Friends, have their heads attached with strings but the strings are then cut off close to the knot and sometimes dabbed with glue. These can be difficult to untie, but a pointy instrument (I've used a metal shish kabob stick) to get it loosened will help. Please be careful not to let it slip, though. Some doll owners also tuck the strings into the body to get them out of the way and you'll need to fish them out first. Once the knot is untied just stretch the material around the neck and the head will pop off.
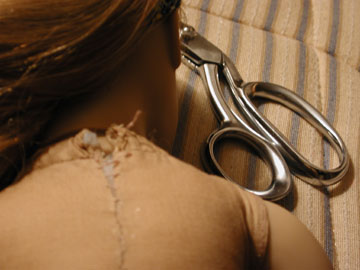
Cutting a zip tie is harder than untying a string. Usually you have to expose the zip tie first by snipping some stitches over the fastener. The edges of the fastener are square so it is generally covered well to prevent scratching.
The zip tie can be very difficult to cut and you need to be very careful not to slip with your scissors and knick yourself.
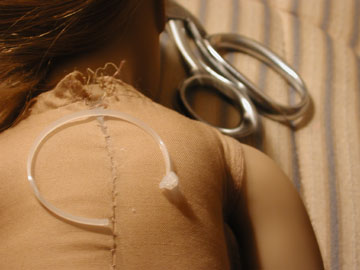
Now that the fastener is removed, the head will come right off.
Put the new head back in place and make
sure the polyfill is all tucked back inside. Tighten the string and double
knot it. Zip ties are easier to put in, so if you do
not intend to change the head again, it may be easier to replace a zip
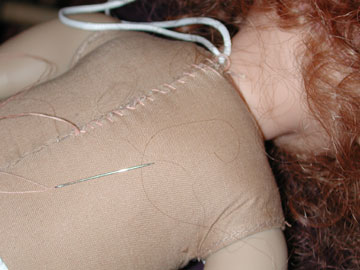
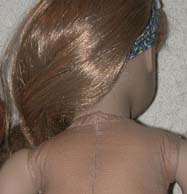
tie. You can The Our Generation doll body was of such poor quality that the stitches began to come undone on the seam down her back. I had to sew her back up even though she now has a string tie.
Now both dolls have their (new) heads tied back on.
After re-dressing them, the operation is complete!
If you got here from the Doll Restoration Wizard, click the button below to go on to the next step.
|
![]()
Copyright © 2003 Maria Greene All Rights Reserved
This page was last updated 08/05/06
 zip tie. There is a flange at the base of the neck to make the head stable
on the shoulders and a groove above the flange that the string or zip tie
(in the casing) fits into. To remove the head you just have to untie the
string or cut the zip tie.
zip tie. There is a flange at the base of the neck to make the head stable
on the shoulders and a groove above the flange that the string or zip tie
(in the casing) fits into. To remove the head you just have to untie the
string or cut the zip tie. 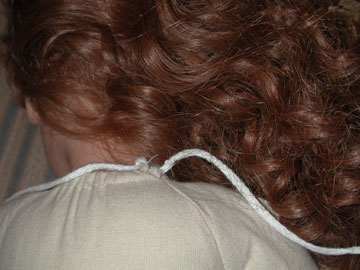
 You want the string to be tight enough so that the head does not wobble
(or, worse case, the head falls off again while a little girl is playing
with it). But, take care not to tighten the string so tightly that it is
difficult to turn the doll's head.
You want the string to be tight enough so that the head does not wobble
(or, worse case, the head falls off again while a little girl is playing
with it). But, take care not to tighten the string so tightly that it is
difficult to turn the doll's head. 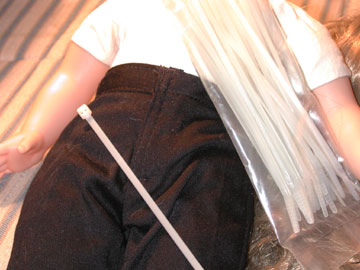 find these sold as wire wraps at any Radio Shack store. Try to get the
narrowest ones you can find with the smallest fasteners. When you insert
the end of the tie through the fastener (ribbing to the inside) the little
ribs will keep the end of the tie from coming out again. Tighten the tie
(but not too tight) then clip it off as close to the fastener as possible.
You can use scissors or a toenail clipper to cut it (I use an old dog nail
clipper). Try to make the cut flush so it does not leave a sharp piece of
plastic. You will need to stitch the casing closed again over the fastener
of the zip tie to keep it from scratching anyone.
find these sold as wire wraps at any Radio Shack store. Try to get the
narrowest ones you can find with the smallest fasteners. When you insert
the end of the tie through the fastener (ribbing to the inside) the little
ribs will keep the end of the tie from coming out again. Tighten the tie
(but not too tight) then clip it off as close to the fastener as possible.
You can use scissors or a toenail clipper to cut it (I use an old dog nail
clipper). Try to make the cut flush so it does not leave a sharp piece of
plastic. You will need to stitch the casing closed again over the fastener
of the zip tie to keep it from scratching anyone.